DVDSWAN 02 Sport Trac Build/Maintenance thread

Ford SportTrac Forum

Help Support Ford SportTrac Forum:

This site may earn a commission from merchant affiliate links, including eBay, Amazon, and others.
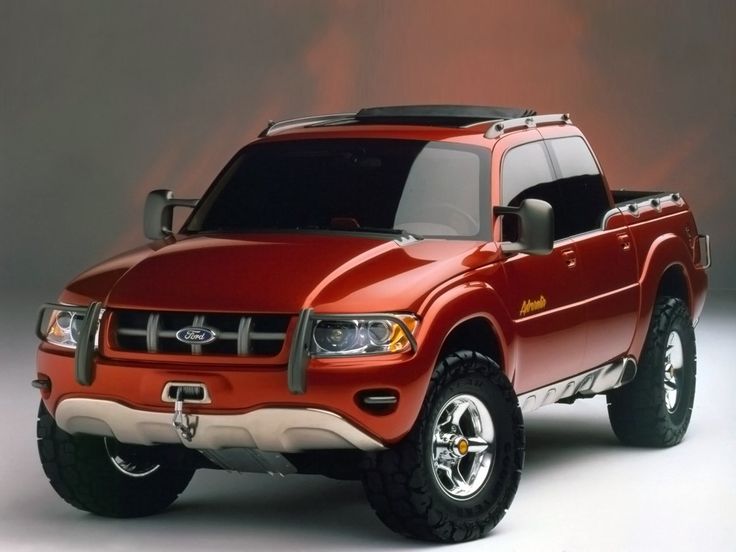
I think I'm on the ropes on the mirrors. If I can't use them then I'll put them on the wife's Explorer. But ever since I saw a rendering of an concept Adrenalin ST, I can't help to not necessarily copy it but use as a guide...

1996 Ford Adrenalin Concept Truck | Ford sport trac, Henry ford museum, Ford  explorer sport
Nice image and credit to the Henry Ford Museum. It wasn’t on display when I visited there 5 years ago.
 
Had a long and sweaty day putting in new CV axels (tracmotive) and shocks (gabriel ultra truck). My old rear ones were completely done for after 10 years (rancho rs5000x). Also replaced all my dash and a/c lights with leds (sealight). Thankfully they don't have any polarity to worry about. Think i messed something on the cluster though as my autolight no longer kicks on, but if i have to tear up the dash again for that, I'll stick with turning my headlights on manually.

Should have replaced my radio while I was at it, but I forgot to take with me this morning. Got a pioneer single din at the moment but am thinking about doing a double din touchscreen so I can do a backup cam. Any recommendations would be great!

Also discovered that the large corp shop I have gone to a few times over the last six months really screwed up some things. A boot is destroyed on one outer tie-rod and the grease port is mia on the other, my passenger tire is still slightly (but noticeable with the wear now) cambered out despite them checking the alignment 3 times, and a bolt connecting my driver lower control arm to the frame was loose enough that we could hand turn it out/in. They are bout to have have a bad monday
I installed a BOSS dblDIN with a rear view camera mounted on the license plate frame. For the couple hundred dollars spent it was great value. You can check Crutchfield website for fit and any adapter fit kits and wiring but soldering is involved. I also bought a used dash bezel from eBay because of the broken clips and peeling paint on the original. Camera power is spliced into the backup lights and display is manually selected on the screen for it.
 

Attachments

  • IMG_3062.jpeg
    IMG_3062.jpeg
    1.2 MB
@dvdswan: Did those mirrors actually have puddle lights? That would be a great feature to have as my apartment parking lot is quite dark where my spot is assigned.
 
@dvdswan: Did those mirrors actually have puddle lights? That would be a great feature to have as my apartment parking lot is quite dark where my spot is assigned.

The ones I have are for a 02 explorer. They are heated and have puddle lights.

Rockauto has ones for an explorer sport that have puddle lights.

https://www.rockauto.com/en/catalog...assembly,outside+mirror+&+glass+assembly,1304

For them to work you will need to wire in with the dome lights that turn on when you unlock with the key fob.
 
Did the spark plugs and plug wires for the P0303. It's a PITA doing the plugs from the top. I actually got fed up and jacked up the front end and pulled the tires and the plugs were a ton easier to access. #3 was still a little testy but all was well.

The old plugs were gapped from .027 to .033, FSM states .061 to .067. Gapped them at .064. Truck did fire right up but truck started idling rough. The plug wires I got, which I thought were really good and direct replacements, not one of them snapped on to the plugs, really kind of pissed me off. I tried pinching them closed a little, didn't work. Apparently, there wasn't an inner clip on any of them. I would highly not recommend these ones. I now am getting a P0301, P0303, P0304, and P0305. SMH. Amazon is not showing the wires anymore and I tossed the box. There were 8mm and red.

What plug wires do you guys recommend.

The plugs are NGKs and I've never had any issues with those. Amazon didn't have Autolites which I would have preferred.
I use motorcraft wires for my Ford vehicles. Nothing better out there than an exact replacement
 
Ordered a set off rockauto last night.
 
So, after the week of working away from home I get home and installed the Ford plug wires. Definitely made a difference and noticeable click when pushing onto the plugs. I definitely have more performance but the I still have the P0303 misfire. So, I guess I'm ordering a new injector.

Should I get just one or all six?

On a bad luck note, I was mowing the yard and while doing the side yard the mower kicked up a couple of stones/pebbles and I thought I need to be careful because I was right next to the camper shell. Low and behold, some little pebble had a better idea and I saw fly right out of the mower and hit the driver window on the ST. "POP" said a few choice words and continued to mow. Went to the backyard and started to mow on the other side of the fence from where the camper shell was and noticed that it had a broken window as well. WTF!!! Double Whammy.

Just when you get ahead and start to make forward motion, life reminds you that Murphy is just snooping around the corner ready to pounce and slaps you in the face. Stupid law. Well, looks like the junkyard will be on the list for this weekend and do some window shopping.
Check around for a shop that does ultrasonic cleaning and testing. I do that in my shop here in Phoenix. It's the best way to clean and check all your injectors. Also, it's more cost effective than buying new Ford injectors.
So, after the week of working away from home I get home and installed the Ford plug wires. Definitely made a difference and noticeable click when pushing onto the plugs. I definitely have more performance but the I still have the P0303 misfire. So, I guess I'm ordering a new injector.

Should I get just one or all six?

On a bad luck note, I was mowing the yard and while doing the side yard the mower kicked up a couple of stones/pebbles and I thought I need to be careful because I was right next to the camper shell. Low and behold, some little pebble had a better idea and I saw fly right out of the mower and hit the driver window on the ST. "POP" said a few choice words and continued to mow. Went to the backyard and started to mow on the other side of the fence from where the camper shell was and noticed that it had a broken window as well. WTF!!! Double Whammy.

Just when you get ahead and start to make forward motion, life reminds you that Murphy is just snooping around the corner ready to pounce and slaps you in the face. Stupid law. Well, looks like the junkyard will be on the list for this weekend and do some window shopping.
1000004084.jpg

Find a shop that does ultrasonic cleaning and testing. It's more cost effective and you'll know all your injectors or working perfectly. This is the one in my shop here in Phoenix. I've fixed several misfires for customers using this machine.
 
So, after the week of working away from home I get home and installed the Ford plug wires. Definitely made a difference and noticeable click when pushing onto the plugs. I definitely have more performance but the I still have the P0303 misfire. So, I guess I'm ordering a new injector.

Should I get just one or all six?

On a bad luck note, I was mowing the yard and while doing the side yard the mower kicked up a couple of stones/pebbles and I thought I need to be careful because I was right next to the camper shell. Low and behold, some little pebble had a better idea and I saw fly right out of the mower and hit the driver window on the ST. "POP" said a few choice words and continued to mow. Went to the backyard and started to mow on the other side of the fence from where the camper shell was and noticed that it had a broken window as well. WTF!!! Double Whammy.

Just when you get ahead and start to make forward motion, life reminds you that Murphy is just snooping around the corner ready to pounce and slaps you in the face. Stupid law. Well, looks like the junkyard will be on the list for this weekend and do some window shopping.
AIN'T that the TRUTH
 
Well, that was a total fiasco replacing the driver side front window glass. 1st hour was spent vacuuming broken glass out of the door, interior, and ground. Pulled the run channel to clean out all the broken glass from it. Didn't realize the lower slide piece needed to stay so I popped it off. The new glass from the junkyard came with lower slide piece at the bottom so I had to cut the rivets off so I could pop the slide piece back on which ended up going on backwards. :rolleyes: Popped it back off and flipped it so the glass would bolt up. Used 1/4-20 bolts and hardware to attach the glass to the slide. Vacuumed more glass up. Put the interior window sash on, door panel on, forgot about the door lock knob rod which got stuck under the top of the door panel and didn't notice it until all the hardware was put on. Pulled the door panel back off to get rod out and into the knob hole. Sadly, the whole fiasco took about 4 hours. :rolleyes:

But the glass is in and running smooth up and down. Even lube the channels.
 
So, I had a little of "me time" and worked on the ST. I decided to start something quick and easy, so I started the tailgate handle swap. Total time approximately 30-45 minutes.

Before:
IMG_2626.JPG


Pulled the inside cover, (6) T30 screws and (4) plastic push clips.

IMG_2627.JPG


This gives access to the handle screws, (2) 11mm nuts, remove the nuts and the handle will be able to be maneuvered out of the tailgate.

IMG_2628a.jpg


The key lock cylinder can be removed by pulling the "c" clip, the cylinder will pop out to the rear of the handle.

IMG_2629a.jpg


The lock cylinder will basically slide right in the new handle, be sure to have cylinder end up flush with the top of the cylinder holder. This will ensure it is properly seated in the "c" clip. You can see below the handle with the "c" clip (the new handle comes with it).

IMG_2630.JPG


On the inside of the tailgate to hold the wires, I cleaned an area with parts cleaner then with alcohol to be sure no residue was left behind and used cable tie mounts like this below.

1717288406849.png


IMG_2631.JPG


I also ran wire for a power door lock actuator for a later install.

IMG_2632.JPG


The ziptie tail was cut flush with flush cutters, similar to below.

1717288619581.png


This will cut the ziptie tail flush with end of the lock on the ziptie and remove any chance of slicing your hand/arm open requiring stitches. Then I twisted the ziptie so the end was away from the work area as well. This is only a pet peeve of mine for a cleaner install. But I do recommend it to save your skin...

IMG_2633.JPG


I installed another cable tie mount closer to the side of the tailgate and coiled the rest of the video and power cable. I covered the end of the video cable so no dust/dirt with electrical tape and left a buddy tab. I really hate trying to peal of tape when it is wrapped flat and you know you're going to be removing it (another pet peeve).

IMG_2634.JPG


I need to buy a longer 1/2" drill bit to reach the inner plate/panel and install a grommet to protect the wires.

IMG_2635.JPG


On the bottom of the tailgate will be another 1/2" hole with a solid grommet with a slice to allow the wires to go through. You can see part of the hinge on the bottom of the tailgate (this is just for you locational awareness). I'll remove the tailgate and run a steel coat hanger up through the holes to pull the wires down. Then attach another cable tie mount to ziptie the wires too. I'll probably run them in corrugated tubing to further protect them from the elements. Which will go into a 1/2" hole below the tailgate hinge mount on the bed. (sorry no picture at this time).

IMG_2636a.jpg


New handle installed with camera.
IMG_2637.JPG


Lower angle looking up.

IMG_2638.JPG


More to follow....
 
Great thread, thanks for the detailed work..
 
Well, that was a total fiasco replacing the driver side front window glass. 1st hour was spent vacuuming broken glass out of the door, interior, and ground. Pulled the run channel to clean out all the broken glass from it. Didn't realize the lower slide piece needed to stay so I popped it off. The new glass from the junkyard came with lower slide piece at the bottom so I had to cut the rivets off so I could pop the slide piece back on which ended up going on backwards. :rolleyes: Popped it back off and flipped it so the glass would bolt up. Used 1/4-20 bolts and hardware to attach the glass to the slide. Vacuumed more glass up. Put the interior window sash on, door panel on, forgot about the door lock knob rod which got stuck under the top of the door panel and didn't notice it until all the hardware was put on. Pulled the door panel back off to get rod out and into the knob hole. Sadly, the whole fiasco took about 4 hours. :rolleyes:

But the glass is in and running smooth up and down. Even lube the channels.
I’m pretty sure my receding hairline is due to many long labored routines such as this. Thanks for the takeaways from your efforts!
 
Got to work on the ST again today. The plan was (that's never a good start, LOL) to replace the #3 injector. While I was at it I was going to install the t-stat housing and do both tensioners. I used the link below as a guide, pretty decent step-by-step.


Everything was going well until I found the injector sleeve for #3 was broken, most likely that was the cause of the misfire.

IMG_2649.JPG


I wasn't real happy to see that. Looked at rockauto they were between $11 and $18 but I needed them today, so I called a couple parts stores and NAPA had them but they would have them until Monday or I could drive to store. Since it was only 30 miles away I went and got them and found out they thought they were gold sleeves at $42. (sigh) Bit the bullet I wanted to finish the truck today. Got home had to watch a video to see how you install them.


Finished that, installed injector and fuel rail on pass. side. Started on t-stat housing, removed it and went to clean the surface for the gasket...

IMG_2650.JPG


I don't remember seeing a set pin... Hey why are there only 2 bolt holes I did 3. (sigh) Well, at least there was a good 1/4" sticking out of the lower intake. Got some Vise grips and tapped on the set screws and twisted. 5 minutes later...

VICTORY!!!!

IMG_2651.JPG


Had to run to the local Ace Hardware and find a M6x1.00x80 bolt.

Replaced the l/s tensioner and then installed the new t-stat housing.

IMG_2652.JPG


Didn't think much about it at the time but the coolant sensors were kind of loose, didn't think about replacing the gaskets with the o-rings from the plugs. (sigh) Everything when back together really smooth after that and started to refill the coolant. 1/2 way through the 2nd gallon I start hearing water dripping. Look underneath and sure enough (sigh) coolant dripping from front of engine. Grab a flashlight and searched to see if I missed a hose. Nope both coolant sensors were seeping. (explicitives followed)

So, I tried to just loosen intake and get to the sensors but no joy. So, I have to repull the intake on the 4th. :(

I swear this truck likes to fight me. LOL but I will succeed.


I do have a question though.

I think the PVC valve is bad because 1 and 4 intake runners were oily and gooey on the inside. A sticky gooey. Would the PVC cause this?

IMG_2653.JPG
 
Ok, so everything is all back together and running smooth. No CEL anymore. That always feels good. I ordered new coolant sensors, come to find out the sensor PCM is different from the actual coolant sensor. I just swapped the o-ring from one of the new sensors to the original PCM sensor.

Question:
Is there a specific name for the PCM coolant sensor? It is obviously different because the tab for the connector slide on is moved over a bit from the coolant sensor.

So, this maintenance period I took care of...
P0303 Misfire - broken injector sleeve allowing air into the injector area creating the misfire.
Both timing chain tensioners were replaced.
Thermostat housing was replaced with aluminum one.

Found out that a couple of screws were missing or the wrong ones. So, a junkyard run is on the plans now. Which makes me think...

What do you bring to the junkyard to pull parts?
A rolling box of several tools. Wrenches, sockets, screw drivers, pliers, etc. No cutting tools. Most won't let you in with a sawzall
 
Bring every tool you own. If you don't bring it, you'll need it :) A lot of junkyards have wheelbarrows you can use to carry tools and parts. Btw, when you have the intake off it's a good time to clean your MAF sensor and throttle body. I just did this the other day, only takes a few minutes. I actually took the throttle body off so I could really clean the back. Noticeable difference when the truck is idling.
 

Latest posts

Top