DVDSWAN 02 Sport Trac Build/Maintenance thread

Ford SportTrac Forum

Help Support Ford SportTrac Forum:

This site may earn a commission from merchant affiliate links, including eBay, Amazon, and others.

dvdswan

Active Member
Supporting Member
V6 Engine
4 wheel drive
2002 1st Gen
Joined
Nov 30, 2023
Messages
229
Reaction score
160
Location
Seattle, WA
What engine do you have?
V6 engine
What year is your Sport Trac?
2002
What Generation is your Sport Trac?
1st Gen Owner
Well as it begins, there are a few items that need to be addressed for my Sport Trac. Don't actually have time until this Friday to start troubleshooting but I've been looking / researching the items.

1703087190204.png


1703087320097.png


1703087341060.png


1703087367717.png


1703087412387.png


1703087436917.png


1703087465275.png


1703087485171.png


1703087514140.png


So, the first big issue is the 4WD operation. The "4x4" and "4L0" lights on the dash do not come on when the truck is started for the bulb check.
I went to the tech section Transfer Case Troubleshooting - The Ranger Station Under the Trouble Shooting for the 1995 & Newer Transfer Cases:
Symptoms:

1) When starting vehicle, the “4WD” and “4WD LOW” lights on dash never illuminate. NO LIGHTS

2) After turning 4WD switch (knob on dash) there is no response at all, 4WD light on dash never illuminates and no clicking. Not lighting or flashing.

3) 4WD will not engage. Not engaging

I plan on going through steps 1-5 on Friday.

1703087218395.png
1703087228173.png

1703087243128.png


Next Item will be the Power Mirrors being inoperative. So, I'll be checking the fuse for that then testing the switch for power and operation.

I noticed that a couple of body mounts were toast so those will be coming soon.

Missing antenna and jack. I'll grab those from the junkyard next time I go.

Tailgate handle is hard to operate. Suspect linkage is either bent or plastic clips are starting to fail.

Thermostat housing is the plastic one, so that's added to the list.

Tensioners as well.

No oil on the driveway but undercarriage is wet. Need to clean up and check for leaks.

Change fluids and filters.

Replace burned out dash lights. 4x4 switch back light, rear window switch light. CC switches on the r/s of steering wheel are out, but I image that would be a whole switch replacement.

I'm sure I'll find more down the line.
 
Last edited:
My 4x4 is finicky as well. If the 4x4 lights come on momentarily after starting, but not when you switch on the 4x4, that means its a module issue. That is the problem i had. The 4x4 module (transfer case) is located behind the passenger side kick panel. It might help to get in there and wiggle things around. I find the best way to keep the 4x4 working smoothly is to use it frequently. If your 4x4 lights do not come on for a second after starting, then it must be a bulb/fuse problem. I hope you can find the problem and that its an easy fix!
 
So, 1st mod. Really not a mod but a removal. I removed the distractor from the center dash. I no longer have a phone holder below the rear window switch. LOL


IMG_2494.JPG


It seems like it would be a great place to put another switch. Maybe a defrost switch for heated mirrors... 🤔

After a quick search I found a wood grain one... Just swap the wiper switch with the rear up/down switch.

s-l1600.jpg


Also took pictures of the interior...

Is the seat material like a denim? Interior needs a good scrub and wipe down with all the Armor All they put on everything.

IMG_2482.JPG


IMG_2483.JPG


IMG_2484.JPG


IMG_2485.JPG


Missing a dang jack...

IMG_2486.JPG


IMG_2487.JPG


IMG_2488.JPG


IMG_2489.JPG


I guess a factory subwoofer?

IMG_2490.JPG


So, I'm hoping the aftermarket radio install wasn't all hacked up...

IMG_2491.JPG


IMG_2492.JPG


IMG_2493.JPG


And found a microphone for the BT radio and clipped it on its base...

IMG_2495.JPG


Radio is a Kenwood KDC BT275U

IMG_2494.JPG
 
Last edited:
Went through and checked all the fuses, pulled the connections on the 4X4 CM and checked that for any visually bad components. All good. Checked relays. All good.,

So, I'm ordering a 4X4 CM. Big bummer.

Power mirrors... verified power to the switch but couldn't check continuity of the switch because I didn't know which pins were what. Since both mirrors don't move, I am ordering the switch.

Started digging into the radio operation, works great as I stole the antenna off the wife's Explorer. Next problem is I need to change it from Espanol to English. Tried to do a factory reset but that just wiped the channels and maybe old phones. Not sure about the last part, I didn't look there.

I do have a question on the fuse cover in the engine compartment. Is it suppose to match the layout exactly?

This is the layout...
Screenshot 2023-12-23 151844.png

but the cover looks like this... just imaging the numbers are facing correctly.
Screenshot 2023-12-23 151844(1).png
 
Well, in this case it's the "fat electron". 🤔 You know the one, makes a corroded connection so when you disconnect and reconnect it clears itself.

I went to test the switch, power to it, and grounds. Broke the stupid clip on the connector. :mad: Plugged it back in the switch and saw the 4x4 light come on then off. Weird. Put the bezel back in place turned the switch, heard the CM click and the light came on. Turned to 4LO, heard the CM click and the light came on. Turn it 2WD, started the truck, put in 4x4, light came on and did a slight turn and could feel the front end pulling. SWEET. :D Straightened the truck out, put in neutral and put it in 4LO, light came on and stump pullin' power was present. SUPER SWEET! :D

So, PFM happens every so often and it feels good. Didn't have to climb under truck just yet. :cool:
 
Today, I picked up the power mirror switch. Pulled off the dr. door panel, 4 screws 5.5mm head (2) behind the pull handle and (2) at the bottom of the door panel. There is a little plate at the door handle, it has integrated flat clips on the top and bottom of the plate. It pops of very easily. The multifunction window switch has (2) metal clips, (1) in front and (1) in back. This lifts up fairly easily as well. Disconnect the door lock switch connector and the (2) connectors for the power windows. Pop out the clips (2) at the bottom of the door and (3) on the front and (3) on the back.

IMG_2500(1).jpg


It's a lot easier if you have an interior trim tool kit.

1703622712684.png


Once all the door panel clips are disconnected, you can just lift straight up to detach it from the window belt trim. You can now disconnect the mirror switch. The mirror switch has (2) clips (1) on top and (1) on the side. If you push in the (1) on the side 1st it will be easier to get it out after pressing the top clip. Once the new switch is installed you can just put the panel back on. The 1st step is to line up the window belt trim, have the window down then start with the back of the door panel 1st at a slight angle, line up the lock knob and with the corner of the panel in window belt trim track the panel will just guide itself in the trim track. Then reverse the process of removing the door panel.

IMG_2507.JPG


This whole job took about 20 minutes total. If it's your 1st time go slow so you don't break any plastic clips or the parts that hold the clips on the door.

The next task was to find out why my tailgate handle was difficult to operate. You would have to pull up really forcefully to get it too unlatch. I was thinking that something was bent or a plastic clip was going to fail. There are (6) T30 Torx head screws towards the top of the tailgate. (2) on the left side, (2) in the middle, and (2) on the right side. Then there are (4) body clips at the bottom.
Once the panel was off, I could tell that all the mechanisms were dry and dirty. Took some brake cleaner spray and sprayed the mechanisms, the latch and (2) locks on each side of the tailgate. Once that dried, I sprayed WD-40 on them with a good soak. Unfortunately, I didn't have any lithium grease which would have been better. I have plans that I want to do to the tailgate so I will coat latches at that time.

IMG_2501.JPG


IMG_2502.JPG


While I was doing this I noticed the poor install of the 3rd brake light on the topper. One of the wires was broken. Surprise there.

IMG_2506.JPG


I'm not a huge fan of butt connectors just for the simple fact that they can fail. These have been open to the elements because the back glass is missing. The wires have corrosion on them as well. I threw some new butt connectors on to get by until I have the proper connector for this.

IMG_2508.JPG
 
Good pics+details.
 
I had this on another site and figured it would be good here as well on info found on my ST.


IMG_2496.JPG


This is cool.
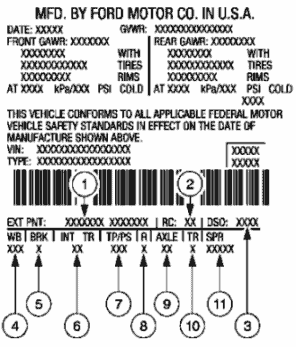
Paint Code: FL - Toreador Red / RC(Region Code): 74 (Seattle) / DSO (Domestic Special Order): (?)
WB (Wheelbase): 126" / BRK (Brake Code): 4 (4 Wheel ABS)
/ INT TR(Interior Trim): PT (P is Cloth bucket w/ adjustable head restraint and 6-way power seat)(T is Dark Graphite)
/ TP/PS (Paint Stripe Code): blank is none / R(Radio Code): 1 (?)
/ AXLE: D2(4.10 w/ Limited-Slip) / TR(Transmission): D(Automatic 5 Speed)
/ SPR(Spring Code): 12(1 - 5B326 (RH), 5B327 (LH) torsion bar)(2 - no info found yet)
/ 1S11A405: Calibration Code (?)

www.blueovaltech.com

Vehicle Door Jamb Sticker Decoding Page

How to decode your vehicle information sticker, including paint, axle, transmission, engine codes, and more.
www.blueovaltech.com

Ford Regions, Districts and Dealer Codes


groups.google.com
groups.google.com

www.blueovaltech.com

Ford VIN Decoder - F150 F250 Pickup Trucks

How to decode your newer Ford truck's VIN - for F150, F250, Ranger, Expedition, and more
www.blueovaltech.com

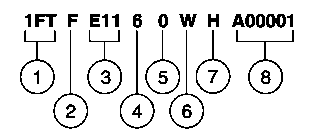
VIN -
1FM - Ford Motor Company, USA, multi-purpose vehicle
Z - (Brake Type)(haven't found) (usually the hydraulic system size)
U77 - (Vehicle Line, Series, Body Type)
E - (Engine Type) 4.0L EFI-SOHC, six cylinder
7 - (Check Digit)
2 - (Model Year) 2002
U - (Assembly Plant) Louisville
B85791 - (Production Sequence Number) A00001-E99999 — Ford Division

1FMZU77E72UB85791 Ford Explorer 2002 - Free VIN Lookup | Vehicle History Report

1FMZU77E72UB85791 Ford Explorer 2002. Free VIN number lookup & vehicle history report provider
www.vindecoderz.com
www.vindecoderz.com

Very cool:

Screenshot 2023-12-22 130522.png


More interesting things:

www.decodethis.com

1FMZU77E72UB85791 - 2002 Ford Explorer Sport Trac : Decode This VIN Decoder

The VIN 1FMZU77E72UB85791 decodes to a 2002 Ford Explorer Sport Trac with a 4.0L V6 SOHC 12V engine.
www.decodethis.com
www.decodethis.com

Screenshot 2023-12-22 131550.png


Screenshot 2023-12-22 131651.png


Screenshot 2023-12-22 131726.png


Screenshot 2023-12-22 131758.png


Screenshot 2023-12-22 131832.png


Screenshot 2023-12-22 131903.png
 
Last edited:
So, today I replaced the one broken and one damaged fog lights.
IMG_2510.JPG


IMG_2511.JPG


To start of I needed to remove the splash shield, 3 Philips head screws (2 facing the tire) and 1 facing straight up at the bottom corner by the tire. Then there are 2 plastic body clips that attach to the top part of the splash shield.

IMG_2512(1).jpg


IMG_2514(1).jpg


This will give you clean access to the fog lamp housing. The fog lamp is held on to the bumper cover with (3) 7mm screw. Remove the bulb connector then the screws. To install the fog light housing reverse the process.

To replace the bulb. After you disconnect the connector, twist the bulb counterclockwise and pull out.
 
Today, drove down to Portland to pick up a factory bed cover and bed divider for the truck. Turns out I picked up a bike rack as well. All FREE!!! Well, 80.00 for gas, so good purchase anyway. Thank you Steve.

So do the 2 handles go next to the cab?

IMG_2516.JPG


IMG_2517.JPG


IMG_2518.JPG


IMG_2515.JPG
 
Today, drove down to Portland to pick up a factory bed cover and bed divider for the truck. Turns out I picked up a bike rack as well. All FREE!!! Well, 80.00 for gas, so good purchase anyway. Thank you Steve.

So do the 2 handles go next to the cab?

View attachment 4781

View attachment 4780

View attachment 4779

View attachment 4778
Great find! I love my oem cover. I put some armorall plastic restorer on it recently and it looks like new. The side of the cover with the lock in the center points to the back. The two rope handles underneath the cover can be hooked to the bed hooks to hold open one side of the cover while driving.
 
Removed the topper and installed the tonneau cover and bed divider in the truck. I'm keeping the topper but have to make a back window since it was gone when I got the truck. I'll have to make since there are none available. :(

IMG_2527.JPG
 
So I tried to lock the tailgate today. Key wouldn't turn. Guessing the handle was probably changed and the lock cylinder wasn't swapped. So how hard is it to re-key the tailgate lock cylinder and does it have a lock actuator in the tailgate?
 
The back tailgate does not get used as much as the ignition does so tumbler and key wear down so if you have a spare with better points on key i would try it and wiggle, this was a issue for a couple trucks i had, with no need for chip take to locksmith shop to have a key made should be cheaper if you take to them.
 
But it should be the same key, correct.
 
yes,, unless someone replaced ignition and had it chipped or replaced ignition and ecm, or tailgate handle, my issue on one of the tracs was key was worn but took awhile to get tailgate to lock. but if ignition was changed you would not be able to use it on doors, if it works on doors then try wd 40 in tailgate maybe lock is frozen up.
 
Well, went out to the truck, tried both front doors and at first, they didn't work. Then the dr. did lock/unlock, sprayed WD in the lock cylinder and it worked smoothly. Sprayed the pass. and tailgate lock cylinders and all work smoothly now. Thank you for the tip @curtis james . I have to remember that this ST has seen some dusty roads. So, lots of cleaning to parts/pieces.
 
When i lived in Ocean Shores for a few years, it was sand, a couple hours from seattle,,,
 

Latest posts

Top